Smore learning please! Using digital flyers to think and learn

Author: Lindsay Sheronick Yearta (Winthrop University)

The winter break over, students and teachers are gearing up for the second semester of the year. As students stream into the hallways and clamor into their classrooms, the excitement is contagious.  How do we keep our students excited about learning long after the first bell has rung?  One way to increase engagement in learning is to integrate technology into the curriculum (Mills & Levido, 2011) to provide students with increased opportunities to collaborate and learn in authentic ways. Provided that students have access to a device and the Internet, thinking and learning can be transformed into a more collaborative, connected, and engaging endeavor.

Using digital flyers in the classroom is one way in which students can  use technology to increase engagement and deepen their learning. Take for example, the students in Mr. John-Joseph’s seventh grade social studies class. At the beginning of the Cold War unit, Mr. John-Joseph realized that some of his students were struggling with the more difficult concepts.  After talking to one of his colleagues who used Smore as a presentation tool with his students, Mr. John-Joseph thought about how he could have his students use the features of this tool to increase thinking and learning in a digital space.

Using Smore as a tool for thinking and learning

Smore is an easy to use website that allows users to create digital flyers. In addition to creating digital flyers or posters, this site can also be used as a digital note-taking pad of sorts. Students can use this site to collect and reflect upon meaningful information.  Instead of one-dimensional, traditional note taking, students can insert videos, links to other sites, images, and can share their thinking and learning with peers.

In other words, Smore can be used as a tool to help students create digital concept maps in the classroom. Concept maps have many synonymous names such as mind maps, semantic maps, and learning logs. These graphic organizers allow students to use the space to record what they already know about a topic, activating schema (McLaughlin, 2010). Students are also able to take notes as they progress through the unit, and reflect on their learning upon completion of the unit. In this way, the mind map can grow with the student.  A problem arises, however, when students are unable to fit the entirety of their thoughts on a traditional paper mind map.

Creating and maintaining the mind map in a digital space allows students to document their learning, reflect upon and question their newfound knowledge, and collect links to supplemental materials all in one place. Embodying the principles of Universal Design for Learning, the teacher can help to build or activate schema for all students using this digital tool (Lapinski, Gravel, & Rose, 2012).  Specifically, if students are lacking in background knowledge of a specific topic, they can easily find videos and websites to help build that schema.

With Smore, after users create an account and log in with an email and a password, they can create up to five free flyers. Students can sign up for individual Smore accounts or can create flyers through the teacher-created educator plan. The educator plan is $39 a year and allows for unlimited flyer creation for educational purposes. In this way, students and the teacher alike could use one login name and password to create unlimited flyers.

Once a template is selected, the user can add a variety of components such as audio, text, picture, form, and gallery onto the flyer by clicking on the appropriate buttons at the bottom of the flyer.  Students can then immediately begin inserting information. Clicking the text button offers students a chance to take notes or reflect on a particular concept.  There are several word processing features that students can use such as making the font bold or in italics. Students can insert text in a bulleted or numbered list format and can also hyperlink text.

A benefit of Smore is the ability for the creator to access analytics.  Analytics provide information such as the geographic location of the viewer, the number of times users have clicked on links, and the frequency of users reaching the end of the infographic. Through the examination of this information, users have a visual understanding of the scope of their words as they gain access to information such as frequency and an awareness of a wide audience.

Smore Learning in the Classroom

After he decided to use Smore in the classroom, Mr. John-Joseph began by creating a sample infographic using Smore to show his students (see figures 1 and 2).

Figure 1
Figure 1

He told his students that this was not a presentation, or even a finished product. Rather, this was a repository of his learning. Mr. John-Joseph pointed out that he included the state standards as his first text box so that he could continuously check and see what his teaching goals were. He used it as a roadmap to guide instructional planning and delivery. He told students that when they created their own Infographic, they could also include the state standards or unit objectives to help them gauge their own progress in learning.

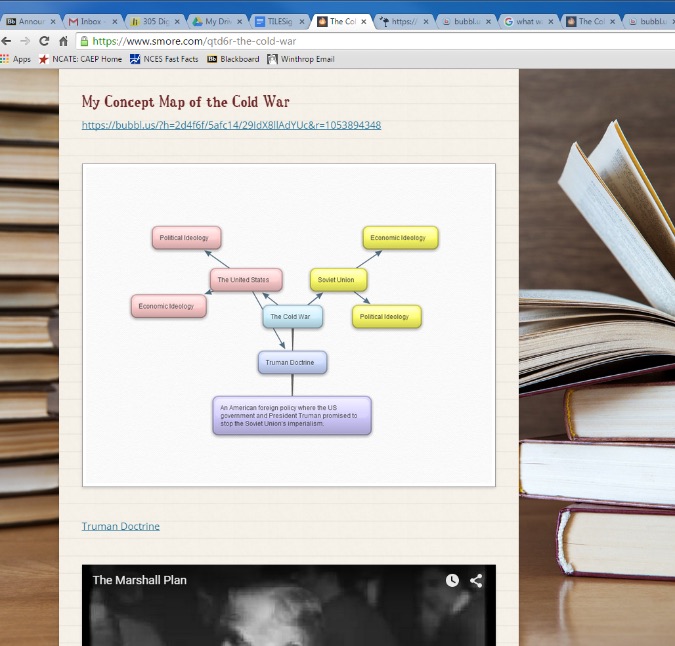
Mr. John-Joseph also started a concept map, using the site Bubbl.us.  He linked his in-progress concept map of the Cold War in his Smore and also inserted a screenshot to show students what it looked like (see figure 2). He thought it was important to show students his work in an in-progress state.  He wanted to demonstrate to students that his knowledge would grow as he investigated topical concepts. Additionally, Mr. John-Joseph shared how he needed to research information on the Truman Doctrine, because he was not certain of the details. After finding a quality website, he linked the site to his page.  He could then review the notes, from his smartphone, anytime he needed to, including while he was waiting in line in the cafeteria.  Mr. John-Joseph also found a short video clip on the Marshall Plan and linked it in his Smore.

Figure 2
Figure 2

After reviewing the  components of his own flyer, Mr. John-Joseph asked his students to take our their devices and go to the Smore website. He explained that students would take notes using the online format in a way that was personally relevant. He reiterated that these flyers were not finished products. In fact, they were to serve as works in progress. They would be repositories of student thinking. These flyers were going to grow in breadth as the unit progressed. Mr. John-Joseph created a Google Doc so that each student could provide a link to his/her personal digital flyer in one, communal place. This would enable  Mr. John-Joseph to monitor students’ progress throughout the unit. Additionally, students would had access to one another’s thinking and could link personal flyers to peers’ flyers.

Marquis, one of the students in Mr. John-Joseph’s class, was struggling with the concept of the Truman Doctrine. So, he searched for additional information and found a website with valid information. He decided to hyperlink the site on his digital flyer. He typed Truman Doctrine, used his mouse to highlight the phrase, and clicked on the hyperlink button.  He then put the website link in the box and clicked link.  The website, with background information, was then hyperlinked to the phrase Truman Doctrine, just as it is here.

Some students prefer to listen to and view information instead of reading. To add a video, students click on the video button and are then prompted to add the link.  After inserting the link, students click embed.  The video is then placed in the digital flyer.  Carolyn found this hyperlinked video on the Marshall Plan and placed it in her flyer.  One of her classmates liked the video so much that he used the share button on Carolyn’s flyer placed it in his flyer as well.

As students progressed through the Cold War unit, using the digital flyer, Mr. John-Joseph noticed that students appeared to be more engaged.  Students were able to locate materials on individual reading levels and utilize supplemental materials as well.  Many students were curious about classmates’ digital flyers and while exploring, had access to increased materials. While Mr. John-Joseph still required his students to read portions of text from the class textbook, he noticed that students seemed better able to grasp the information. He attributed this increased success to students’ augmented background knowledge.

Final thoughts

While Smore can be used for a myriad of purposes such as presentation tools, expert projects, digital mind maps, and for ongoing assessment (Yearta & Mitchell, 2016), in this article, we focused on using the digital flyer for the purpose of  creating and maintaining digital mind maps.

An additional feature of the digital learning is that students can share their learning with family, friends, and people from their community with the touch of a button. Students can receive nearly instantaneous feedback and sharing their knowledge with others makes the learning that much more authentic.

References

Lapinski, S., Gravel, J., & Rose, D.H. (2012). Tools for practice: The Universal Design for Learning guidelines. In T.E. Hall, A. Meyer, & D.H. Rose (Eds.), Universal Design for Learning in the classroom: Practical Applications (pp. 9-24). New York: The Guilford Press.

McLaughlin, M. (2010). Content area reading: Teaching and learning in an age of multiple literacies. Boston, MA: Pearson.

Mills, K.A., & Levido, A. (2011). iPed: Pedagogy for digital text production. The Reading Teacher, 65, 80-91. doi: 10.1598/RT.65.1.11

Yearta, L. & Mitchell, D. (2016). Infographics: More than just digitized posters. Reading Matters, 16, 66-69.

Lindsay Yearta

Lindsay Sheronick Yearta is an Assistant Professor of Literacy at the Winthrop University. A former elementary school teacher, her research interests include digital literacy, vocabulary acquisition and retention, and critical literacy. She can be contacted at yeartal@winthrop.edu.

Nearpod: A Cool Tool for Interactive and Engaging Lessons


Kristin Webber

Author: Kristin Webber (University of Edinboro)

Every teacher at one time or another has struggled with keeping students engaged in their lessons. Educators are constantly searching for ways to make sure every child is heard, assess student learning in real-time, and simply make learning enjoyable for our students. Nearpod (www.nearpod.org) is the perfect solution for teachers looking to create interactive, engaging lessons that allow for real-time assessment. Nearpod is a multi-platiform mobile presentation tool that works on any digital device including Bring-Your-Own-Devices, Laptop Carts, Tablets. iPads and can even be used for distance learning. Once I discovered this tool, I knew that it would be a perfect way to engage my undergraduate literacy students in my lectures as well as teach them a new tool that they can use in their future classrooms.

Upon signing up with an email address, users can instantly begin creating their presentations. Existing documents such as PDF’s and PowerPoints can be uploaded or teachers can use the tools offered in Nearpod to create new slide presentations. Users can integrate video and audio files to the slides as well as a PDF viewer and even access live Twitter feeds. What makes Nearpod different from other presentation tools is the ability to add interactive features to the presentations. These interactive features include polls, quizzes, fill-in-the-blanks, matching pairs, open-ended question response, and draw it. Draw it is especially useful for younger students or students that have difficulty with keyboarding. Instead of typing their responses they can draw their answers. These tools allow students to interact with the content that is being presented and provide the teacher with real time assessment of student understanding.


Figure 1


Once a presentation is complete and ready to be used as a lesson, a unique user code is generated for students to log in with from any device. Once students are logged in, the teacher controls the presentation from his or her device. The students are not able to move ahead or switch the slides on their own. From the teacher view of the presentation, he or she is able to view the results of the interactive features (i.e. quizzes, polls, etc) and participation instantly. This real time assessment capability allows teachers to adjust their instruction on the spot based of feedback from their students. They can also see which students did not answer and which students logged out of the lesson. Once the presentation is complete, teachers can run an assessment report that will provide a summary as well as responses to each interactive feature that was utilized within the session.


Figure 2


A Class Session Using Nearpod

I made the decision to use Nearpod in my undergraduate literacy foundations course when I noticed many of my students sitting passively through my lectures. Upon planning to use Nearpod for the first time, I loaded the app on the university iPads and instructed my students on how they could access Nearpod on their own devices. At the beginning of each class session, I post the Nearpod join code on the whiteboard and student log in upon their arrival to class.

I begin each session using one of the interactive features to activate prior knowledge. It may be an open-ended question designed to gauge their familiarity with a topic or I have used the poll feature as an anticipation guide before introducing new concepts. As I present content using the slides, students have the option of clicking on the notes tool and can type their notes right on the slide and then email their notes to themselves when the session is over.


Figure 3


As I present the rest of my content, I use a variety of strategies. I use the slide feature that resembles a PowerPoint presentation as well as embed video and/or audio clips. I may ask students to perform a specific task on a related website so I will create a slide that guides them directly to the correct site. I also embed assessments questions throughout so that I may gauge student understanding. The majority of my Nearpod lectures/presentations are intentionally preplanned. However, Nearpod also offers a feature for on-the-spot assessment. By simply clicking a down arrow, I can have students provide feedback on their learning through multiple-choice or true/ false questions, an open-ended response, or a drawing activity. At the end of my lectures, I also like to include a summative assessment that allows me to look what the students took from the class. Again I use the quiz or polling feature to ask students questions but I also have students respond by listing one or two valuable ideas that they learned that day. I use these as exit tickets and students do not have the option of not answering.

Results of Using Nearpod

My undergraduate students love using Nearpod! Even as adult learners, they welcome the opportunity to have technology integrated into their instruction. They like the fact that Nearpod can be used on any device. For instance, one of my student’s iPad died during class, she instantly pulled out her smartphone, logged in, and kept right on going with the lesson. The multi-platform versatility of Nearpod offers easy implementation for schools and classrooms. Many schools do not have the luxury of 1:1 devices for their students, which is the case in my own teaching context. We only have 20 iPads available and I have 24 students in my class so my students are easily able to use their own devices to participate.

My students have commented how this tool allows everyone to have a voice. Some of my students, just like K-12 students, are not comfortable participating in class discussions. Nearpod allows them all to have a voice and participate in class. My students also enjoyed the instantaneous feedback that Nearpod offered when using the assessment tools. Most of the time, assessment feedback led to rich class discussions where we were able to bring misconceptions to light and clarify misunderstandings right on the spot. My students really valued and appreciated this opportunity.

Finally my students liked that Nearpod presentations can be shared. I typically save my presentations in a PDF format and upload them to our course learning management system making it available for students to go back and review. Nearpod presentations can also be shared through email, social media, direct links, and can be embedded into other websites. When asked if my students saw Nearpod as a tool for use in their future classrooms, they all emphatically responded “Yes!” Because I want my students to have experience with this tool from a student and a teacher perspective, they will use Nearpod to deliver a lesson they created to actual primary grade students that they will be working with later in the semester.

The Future with Nearpod

            Nearpod also has a homework feature which allows teachers to assign a session code for the presentation to be completed outside of the classroom. Since Nearpod has been a success in my face-to-face courses, I would like to expand my use of the tool. For spring semester, I plan to use Nearpod as a way to facilitate my flipped classroom. In the flipped classroom model, the teacher records his or her lessons and makes them available to the students prior to the class. Through the application, I plan to narrate my content using the audio feature. Throughout the presentation, I will embed opportunities for students to self-check their understanding and they will have to complete a summative assessment at the end of the presentation. Prior to class, I can review the assessment data and plan my lectures around concepts that need more attention and use our limited class time more effectively. I am really excited to start this model and think Nearpod will be an effective way to accomplish my goal and provide a worthwhile learning experience for my students.

Final Thoughts

Nearpod is a fabulous tool for making lessons at any grade level engaging and interactive. The best feature of Nearpod is that the basic version is free! The free Silver version provides access to the platform and app as well as quiz and polling features. For a yearly fee, users can upgrade to the Gold version which provides extended storage and presentation size, multimedia integration, and options for the student paced homework sessions. There are also options for school and district volume pricing.

Once educators sign up and create an account, they have access to Nearpod’s extensive presentation library. If you are looking for a lesson on a specific topic, more than likely there is a presentation that already exists in the library. There are options for all grade levels and content areas. Many of the existing presentations are offered free and some for a small fee (around $2.99).   All presentations have the option to preview them before a commitment to purchase is made.

As we move further into the digital age, students expect their in-school experiences to mirror their digital lives outside of school.   Nearpod is a great tool to take that first step to integrating technology into classroom instruction. The tool is inviting and engaging for students while still allowing teachers to control the content that is being shared in class. As one of Teach Thoughts top 52 Apps for the Classroom in 2015 (www.teachthought.com) I highly recommend giving Nearpod a try!


About the Author: Kristin Webber is a veteran teacher with over 20 years of teaching experience. Currently, she is an Assistant Professor in the Department of Early Childhood and Reading at Edinboro University where she teaches both undergraduate and graduate courses in literacy. She also serves as the Program Head for the Graduate Reading Program. While in the classroom, Kristin has taught at every level from preschool to high school. Her research interests include the New Literacies, instructional technology, adolescent literacy, and reluctant readers.